 Combo Offers
Undoubtedly, a beginner will find the process of mastering Perfecting Nail Art Designs quite tough! Nevertheless, it is possible to get over all the challenges with time and ensure that you achieve your dream design. This blog will take you through every single step that is involved in coming up with great nail art. Therefore, read it, buy yourself some nail paint online, and then get down to business!
Step-by-step guide for nail art designs
The steps you will need to follow for a perfect nail art design are as follows:
Prep your nails

You have to first Perfecting Nail Art Designs well. This is done by removing any old polish, cleaning off any stains and cutting them to the desired length. Here’s a detailed explanation:
Remove your old nail polish
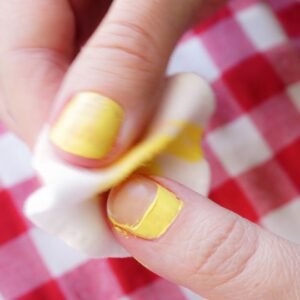
You should use an effective nail paint remover to get rid of your old nail paint. Always resort to a good nail polish online, or else it becomes difficult to remove and leaves stains.
File and trim your nails

Following the cleaning of your nails, you should trim them and then use the nail file to shape them so that they appear uniform.
Apply basecoat

This is an important step hence should be strictly followed before doing nail art. It is a transparent or bluish fluid that often comes along with your nail polish. It helps to keep the nail protected from the harmful chemicals of the nail paint and prevents staining.
Try out these amazing beginner nail art designs!
Did you lately buy nail polish online? Here are some of the most beautiful yet easy designs you can try as a beginner:
Glittery nails

Mix loose glitter of your chosen shade into the nail varnish. Apply the mixed polish to the nails and leave it to dry. Add another layer of polish if needed. Finish with a top coat to seal in the sparkle.
Floral patterns

Firstly, apply an even layer of nail polish on your nails and let it dry. Use a small toothpick to create tiny white dots on your nails. Then, make tiny white petals along the dots to form the flowers. If you want, you can add more details such as tiny leaves or anything you like. Ensure your newly created floral design is well sealed with a good top coat.
Polka dots

It’s no secret that polka dots are the simplest nail art designs to do. First, paint your nails with your chosen color. Then use a small brush or toothpick to make tiny polka dots on each nail. Once you’re done with the design, make sure to seal it with a top coat.
Conclusion
Do you want to make your nails look stunning? If so, you should try out some of the amazing design ideas that are shared on this blog. Follow the instructions step by step, and your nails will appear unique beyond belief!